|
| |


|
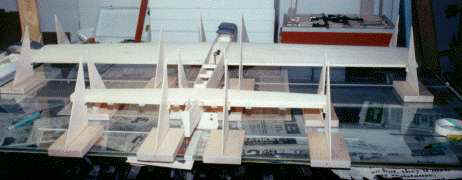
This is a picture of Chiros under construction. The
plane is positioned on height gauges to assure dead on accuracy of all
dimensions. The gauges set the engine crutch, wing, and stab incidence all
at the same time. In addition to setting the incidence it also aligns the
trailing edge of the wing and stab parallel to each other while keeping
the fuselage centerline at 90 degrees to the trailing edges of the wing
and stab. This is all accomplished by working off of the flat glass
surface with reference marks to indicate the position of each component.
The gauges hold each assembly in the proper position while they are glued
together. There is a total of 16 wing and stab gauges and 1 engine crutch
gauge and 1 fuselage support fixture to support the aft end of the
fuselage. If there is a warp in any one of the components the gauge will
pick up the discrepancy. The gauges are also used to align the wing halves
while gluing the center section joint. All components have to be straight
from the start to assure the plane is accurately aligned. A straight
airplane starts with a straight edge and a straight sanding tool. It is a
good idea to have a few 36 inch sanding bars on hand to true up the long
edges of the balsa sheets. I always build off of a flat piece if glass
that is 1/4 inch thick that is shimmed flat with paper. The glass sets on
a metal table. The metal never warps like wood under different
temperatures and humidity variables. A heavy metal office desk makes a
good base on which to lay your glass. I have seen many fixtures over the
years for wings and fuselages. These are important items of the airplane
to keep straight and true but if you have a straight fuselage, wing and
stab and you assemble these components out of alignment the plane will not
fly well enough to be competitive. The alignment starts with a straight
edge against the first piece of balsa and ends when the airframe is
completely assembled. |
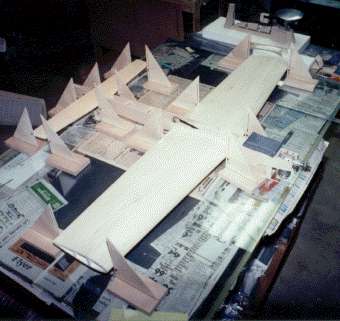 Another
view of Chiros on the gauges. Note the triple beam gram scale in the
top of picture. This is a must for a light weight airplane. It
is also beneficial to keep a written record of your components to compare
later. I had someone show me a piece of aluminum arrow shaft that he
said was lighter than a fiber glass shaft of the same outside diameter.
After setting equal lengths on the scale they were equal in weight, so
don't always trust your judgment when it comes to weight. Another
view of Chiros on the gauges. Note the triple beam gram scale in the
top of picture. This is a must for a light weight airplane. It
is also beneficial to keep a written record of your components to compare
later. I had someone show me a piece of aluminum arrow shaft that he
said was lighter than a fiber glass shaft of the same outside diameter.
After setting equal lengths on the scale they were equal in weight, so
don't always trust your judgment when it comes to weight. |
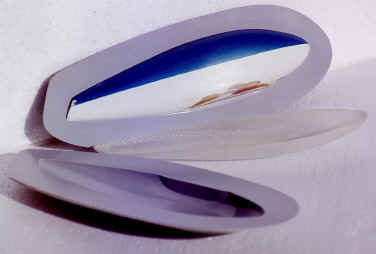 This
shot is of a wheel pant mold, plug and half of a fiberglass wheel pant. I
took a wheel pant off of a discarded airplane and closed the wheel well.
Since the pant was already finished I only had to touch up a few spots.
Once I had the finish I wanted I waxed the plug or wheel pant, built
a dam around the part, which is where the parting line of the mold is
created and applied PVA which is another name for polyvinyl alcohol. Once
the PVA cured it was time to apply a tooling or surface coat to the part.
When the surface coat was dry then multi layers of glass cloth were used
to build up the mold. The weight of the glass pant was the same as the 5
pound balsa pant. The advantage of the glass part is they can be
reproduced with a lot less effort. This is another subject that I will
cover in more detail in the future. This
shot is of a wheel pant mold, plug and half of a fiberglass wheel pant. I
took a wheel pant off of a discarded airplane and closed the wheel well.
Since the pant was already finished I only had to touch up a few spots.
Once I had the finish I wanted I waxed the plug or wheel pant, built
a dam around the part, which is where the parting line of the mold is
created and applied PVA which is another name for polyvinyl alcohol. Once
the PVA cured it was time to apply a tooling or surface coat to the part.
When the surface coat was dry then multi layers of glass cloth were used
to build up the mold. The weight of the glass pant was the same as the 5
pound balsa pant. The advantage of the glass part is they can be
reproduced with a lot less effort. This is another subject that I will
cover in more detail in the future. |
| Tip On Installing
Hinges: Ever have glue wick into your mechanical hinges?
Try filling a metal jar lid with Vaseline or Petroleum Jelly, as it is
sometimes called. Fill the metal jar lid with just enough Vaseline to
cover the hinge barrel when the hinge is folded and dipped. Heat the
Vaseline until it just starts to smoke. Fanning a propane torch under the
lid for a few seconds is usually adequate to heat the Vaseline. Fold the
hinge in half and dip it into the hot Vaseline, wipe off excess Vaseline
on outside of hinge barrel and allow to cool. The Vaseline when heated
will wick into the barrel and pin of the hinge. I have used this method
and was able to demonstrate using thin CA glue on the hinges without hinge
locking up. Vaseline works better than oil because it won't wick out of
the hinge barrel and contaminate the tab of the hinge. It is a good idea
to hold the lid with a pair of Vice Grips and have the Vice Grips secured
in a vise. Even though CA will work for installing hinges in a non foam
wing, it is better to use a slow drying 20 minute epoxy in order to give
yourself enough time to align the hinges. I always glue the hinges into
the movable surface first then after cure glue the surface to the wing or
stab. It is easier to glue the flaps and elevator hinges in after the
airplane and components have been painted. Before the epoxy has hardened
and is still rubbery, pick the squeeze out away with a small screwdriver.
Applying a little wax around the opening of the hinges allows the squeeze
out to be picked away easier. |
|
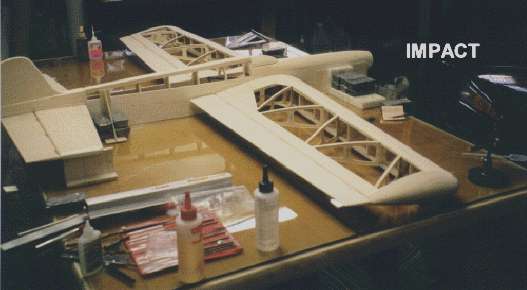
Steve Starr's Impact on the building board or glass.
Steve built a table with a 1/8 inch edge above the table to hold the
Enviro-tech epoxy. The epoxy was poured on the surface of the table up to
the 1/8 edge to create a self leveling flat surface. On top of this
surface he placed a 1/4 inch sheet of plate glass. He works off of this
level flat surface to create a straight airplane. The wing on this
airplane is built using the lost foam method. Lost foam wings are
available through Bob Hunt. Bob offers many popular designs using the lost
foam method. Notice the height gage in the right side of the picture. |
|
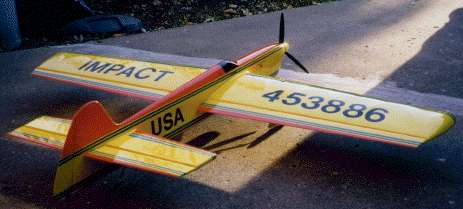
The finished product of Steve Starr's
Impact shown above. Power is a OS 46 VF on a Werwage pipe. Finish is
SIG MFG. dope, rubbed out with simichrome. |
|
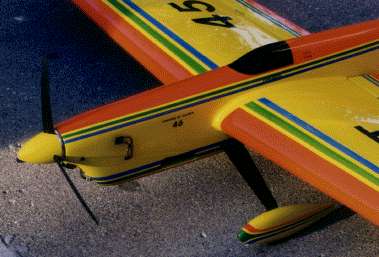
The nose section of Steve's Impact. |
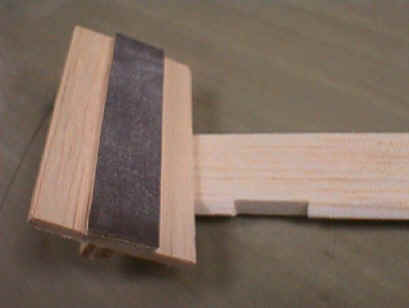
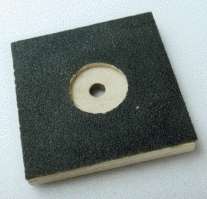 Picture
of a sanding tool used to sand in the nose section to align with back of
spinner. It is constructed of 1/4 inch lite plywood and 1/8 inch
regular aircraft plywood. I always had a hard time sanding in the nose
section of the airplane to be parallel to the spinner back plate until
using this tool. This tool allows you to sand the nose to the right depth
also. When the engine is mounted, insert the shaft through the hole in the
pad and sand by using a twisting motion. Once the counter sunk area stops
against the thrust washer of the engine you are ready to glue in the
plywood nose ring. If you have a 1/8 inch countersunk area on your sanding
pad then you will be able to use a 3/32 plywood nose ring and have a 1/32
inch gap between the back plate of the spinner and the ply nose ring. By
cutting the hole in the 1/8 inch plywood and then gluing it to the 1/4
inch base it saves you from routing out a countersunk area. 80 or 120 grit
sandpaper works well for this tool. Picture
of a sanding tool used to sand in the nose section to align with back of
spinner. It is constructed of 1/4 inch lite plywood and 1/8 inch
regular aircraft plywood. I always had a hard time sanding in the nose
section of the airplane to be parallel to the spinner back plate until
using this tool. This tool allows you to sand the nose to the right depth
also. When the engine is mounted, insert the shaft through the hole in the
pad and sand by using a twisting motion. Once the counter sunk area stops
against the thrust washer of the engine you are ready to glue in the
plywood nose ring. If you have a 1/8 inch countersunk area on your sanding
pad then you will be able to use a 3/32 plywood nose ring and have a 1/32
inch gap between the back plate of the spinner and the ply nose ring. By
cutting the hole in the 1/8 inch plywood and then gluing it to the 1/4
inch base it saves you from routing out a countersunk area. 80 or 120 grit
sandpaper works well for this tool. |
|
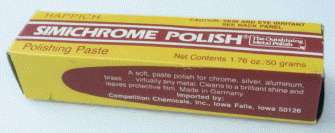
One of the best products I have come across for buffing
out an airplane. This product seems to be the right viscosity for hand
buffing paint. As always it is important to first wet sand with 1200 or
finer paper before buffing. Adding a few drops of dish water detergent to
a bowl of water aids in the cutting action of the paper. When using ultra
fine grit sandpapers make sure you don't store them with coarser grits.
One a little pebble of a coarser grit gets stuck to a piece of 1200 grit
paper it is enough to ruin your day. Along the same line, always wash or
rinse the fine paper before using it. |
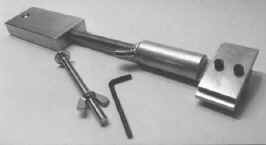 Here
is a neat little tool that I made. I wasn't the first person to make one
of these plane holders but the thing sure comes in handy when painting or
masking an airplane. The airplane is allowed to rotate 360 degrees around
the threaded rod with a wing nut to lock the airplane in any position. The
fixture also allows the airplane to swing side to side from the work
bench. There are two mounting plates attached to the aluminum bar. You
only need one plate when attaching it to your airplane. There are two
sizes for different engines. The aluminum plates are drilled out to the
motor mount lug dimension. The plate is then bolted to the engine beams
while the shaft of the fixture is slid through the nose ring and attached
to the plate. The aft end of the fixture is bolted to the workbench or
C-clamped to a stable ladder. I believe Byron Barker makes a version of
this fixture that is a stand alone version of this one. As the name
implies, there is no need to attach it to a workbench since it has it's
own stand. Byron Barker lives in New Albany Indiana and can be reached
through the PAMPA directory. Here
is a neat little tool that I made. I wasn't the first person to make one
of these plane holders but the thing sure comes in handy when painting or
masking an airplane. The airplane is allowed to rotate 360 degrees around
the threaded rod with a wing nut to lock the airplane in any position. The
fixture also allows the airplane to swing side to side from the work
bench. There are two mounting plates attached to the aluminum bar. You
only need one plate when attaching it to your airplane. There are two
sizes for different engines. The aluminum plates are drilled out to the
motor mount lug dimension. The plate is then bolted to the engine beams
while the shaft of the fixture is slid through the nose ring and attached
to the plate. The aft end of the fixture is bolted to the workbench or
C-clamped to a stable ladder. I believe Byron Barker makes a version of
this fixture that is a stand alone version of this one. As the name
implies, there is no need to attach it to a workbench since it has it's
own stand. Byron Barker lives in New Albany Indiana and can be reached
through the PAMPA directory. |
|
 This
is a home made height gauge used to mark the centerline for the stab and
wing on the sides of the fuselage and wing cores. It is beneficial
to extend the wing and stab centerlines beyond the trailing edge for a
reference for the flap and elevator horn. Before the top blocks or
molded turtle deck is placed on the fuselage, the fuse is placed upside
down on the glass while the wing and stab centerlines are drawn on the
sides with this center line gauge. The marker in the gauge has a
super fine point on it. The marker is replaceable and the height of
the marker is adjustable by loosening the two 4-40 socket head cap screws. This
is a home made height gauge used to mark the centerline for the stab and
wing on the sides of the fuselage and wing cores. It is beneficial
to extend the wing and stab centerlines beyond the trailing edge for a
reference for the flap and elevator horn. Before the top blocks or
molded turtle deck is placed on the fuselage, the fuse is placed upside
down on the glass while the wing and stab centerlines are drawn on the
sides with this center line gauge. The marker in the gauge has a
super fine point on it. The marker is replaceable and the height of
the marker is adjustable by loosening the two 4-40 socket head cap screws.
|
 This
tool is not my idea but it is worthwhile repeating. It is a hinge
recess sanding tool that allows repeatable, uniform and exact hinge recess
slots. The sandpaper is glued to a piece of wood that is the
thickness of the hinge barrel that you are using. The sanding strip
is then glued to a back stop that allows the sander to sand to the correct
depth. A strip of wood is then glued to the back side of the stop to
act as a handle. This
tool is not my idea but it is worthwhile repeating. It is a hinge
recess sanding tool that allows repeatable, uniform and exact hinge recess
slots. The sandpaper is glued to a piece of wood that is the
thickness of the hinge barrel that you are using. The sanding strip
is then glued to a back stop that allows the sander to sand to the correct
depth. A strip of wood is then glued to the back side of the stop to
act as a handle. |
|
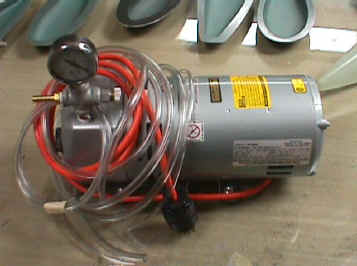 The
mighty industrial vacuum pump. This pump is used to vacuum bag
composite laminates and wood laminates. Future articles will cover
the processes of vacuum bagging balsa/balsa ply laminates, carbon/balsa
laminates and carbon fiber parts. The
mighty industrial vacuum pump. This pump is used to vacuum bag
composite laminates and wood laminates. Future articles will cover
the processes of vacuum bagging balsa/balsa ply laminates, carbon/balsa
laminates and carbon fiber parts.
|
|
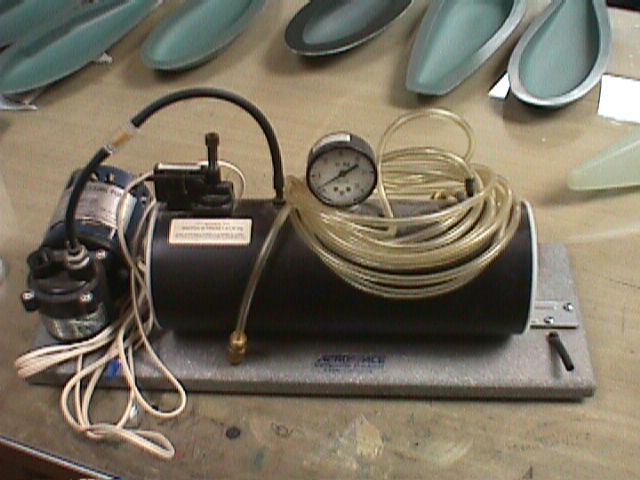 This
pump is available from Aerospace Composites and works extremely well for
the hobbyist. The pump is lighter duty than the pump shown above but
at less cost. I have used this pump to vacuum bag balsa to foam with
great success since the vacuum is adjustable down to eight inches of
mercury. Too much vacuum and the 1# white expanded polystyrene will
crush. This
pump is available from Aerospace Composites and works extremely well for
the hobbyist. The pump is lighter duty than the pump shown above but
at less cost. I have used this pump to vacuum bag balsa to foam with
great success since the vacuum is adjustable down to eight inches of
mercury. Too much vacuum and the 1# white expanded polystyrene will
crush.
|
|