| The Standard Foam
Wing Sheeting Method The old
contact cement or epoxy and stacking weight on the core
and cradle sandwich is the most common foam wing
sheeting procedure everyone remembers as being somewhat
heavy. There is only one chance when using contact
adhesives to adhere the wing sheeting. Any mistakes here
and you have ruined your wing because when the sheeting
comes in contact with the foam there is no repositioning
the sheeting. The contact adhesives tend to
increase the weight to unacceptable levels for upper
level competitive control line aerobatics. The
brush on varieties such as Core Bond tend to be heavy
and sink in between the foam beads to add extra weight.
When using Core Bond it is important to apply the
material to the sheeting and the foam and allow to dry
completely before joining the sheeting to the foam.
Products such as 3M 77 are easier to apply since they
are sprayed on. Some of the 3M products are not
foam friendly so do not use anything but 3M 77 before
testing on scrap foam. When using 3M 77 spray the
wood and foam |
| Wood Selection
Since the wood quantity
is rather large in a foam wing it is important to select
good light wood. Five pound wood seems to be the
norm. The lighter four pound wood is very rare.
I have purchased thousands of 1/16 wing sheeting sheets
and only had twenty or so true four pound pieces.
For a sheet of wood to be an average of four pounds per
cubic foot there has to be some wood in the sheet that
is less than four pounds. When wood becomes less
than four pounds per cubic foot it is almost without
structure. Another way around the weight of the
sheeting is to use thinner wood. Riley Wooten of
Lone Star Balsa will custom plane sheeting to your
specifications if you buy in quantity. If using
the vacuum bagging technique then carbon veil can be
placed under the sheeting with great results. I
have always sheeted my foam wings with the grain running
parallel to the leading edge which helps the wood make
the bend around the leading edge easier. The A
grain wood at the leading edge and the C grain wood at
the trailing edge. A grain wood is easy to roll or
bend parallel to the grain and is the type to use when
molding parts from sheet stock and a foam wing is a
molding of sorts. The C grain tends to resist the
bending forces parallel to the grain and is suited for
the straight flat trailing edge. It is also a good
idea to apply the sheeting over the pre sanded leading
edge and trailing edge. The wing becomes stronger
when the sheeting is applied over the leading and
trailing edges. Place masking tape on the foam and
precede to razor plane and sand the LE and TE down
removing the tape only when final sanding. Use a
sanding block that is at least as long as the part you
are sanding. |
| Edge Gluing
Now here is the part
that takes some finesse. The hardest part is
getting the wood to but together without any gaps.
If you have a joiner at your disposal it makes the job
effortless. I made a fixture to hold multiple
sheets side by side and run them over a joiner to true
the edges up. If you are without a joiner then the
old straight edge and and sanding bar will work fine.
The bar has to be as long as the wood sheet you are
sanding. I have found that even though the wood
has been trimmed with an X-acto it still needs to be
sanded. I believe that the X-acto tends to wander
with the grain slightly. Hang the wood over
your workbench about 1/16 of an inch and sandwich with
another straight edge to keep it flat and lightly sand.
Once the edges come together without any gaps I use
masking tape to hold the sheets together. Hang one
piece of wood over the edge of the bench letting the
masking tape to act like a hinge. Apply a bead of
medium CA glue to the edge of the sheet. Just
enough glue to cover the edge no more and no less.
This takes some practice to get right but when you get
it right you will be rewarded with very little sanding.
Once the glue bead is applied I flip the sheeting on the
table flat and rub the seam with a paper towel until the
CA has cured. I continue gluing the sheets
together until have a large sheet. By gluing
the sheets one at a time to the sheet that is becoming
larger you are able to trim the large sheet if it
is becoming distorted. Distortion usually occurs when
you have to pinch them together to close any gaps.
Enough sheets are glued together to make one sheet and
when cut diagonally makes up two pieces for one wing
half. |
| Sanding The Sheeting
I have had greet luck with
building over glass. Glass is always easy to clean
and can be shimmed flat within a few thousands of an
inch with newspaper. If the glass is placed onto a
metal desk it will hold tolerances that are hard to hold
when using a wood or any other surface that will absorb
moisture. This flat surface becomes mandatory when
sheeting wings or sanding the sheeting or for building
an airplane for that matter. The sanding pad that
I use is 1/4 aluminum about 4 inches by ten inches with
100 grit paper. The 100 grit sounds a little
coarse but with this much surface area on the sanding
pad it is required. Place the sheeting on the
glass and sand with the grain or diagonally to it.
If the glue is applied properly you will not have to
sand the seams very much. Most of the sanding will
have to be done to get the sheet thickness mismatch
evened out. Sand both sides until you are
satisfied with the results. Hold the sheet up to
the light and candle to see if the seams are sanded
properly. |
| Not All Foams Are
Created Equal Most foam
wings are constructed from Expanded Bead Polystyrene or
Styrofoam as most of us know it. The foam is
manufactured in large billets ranging from four foot by
eight foot blocks to four foot by sixteen foot blocks.
These blocks or billets are around three feet thick. The
billets are then placed onto a conveyer and cut into
sheets with multiple hot wires. As with any other
material there are many varieties by many manufacturers.
I have purchased foam that was one pound per cubic foot
but varied in texture somewhat since it was from a
different manufacturer. Most modelers are aware that the
one pound foam is the way to go but fail to realize the
difference in quality of foam. The lumber yards
are a source of foam but of very low quality. The
problem with the lumber yard or building supply variety
is the amount of regrind material. Regrind
material is a recycled foam material that is mixed into
the virgin bead material for a filler. When the
regrind is mixed into the new material it becomes hard.
These hard recycled beads do not cut as smooth as the
virgin bead material and create unsightly gouges or
lines in the core. Some of the lines can be sanded
out but I have had the wire come to a standstill trying
to melt through one of these hard regrind spots.
Contaminants such as wood chips can also find their way
into the foam occasionally. Therefore it is
wise to go to a foam manufacturer and specify one pound
per cubic foot virgin bead expanded bead polystyrene.
Since the cost in transporting one pound foam is high
there are many manufacturers locally if you look in the
Yellow Pages. The cost is prohibitive in shipping
this material so try to locate it locally. |
| Epoxy Vacuum Bagging
Wood To Foam Here is
where the process begins to show some promise for the
competitive aerobatic airplane. The vacuum pump
opens up a whole new set of possibilities. It
makes the heavy contact cement system obsolete along
with setting cinder blocks and sand bags on the wing and
cradle. Not only is there a weight savings in glue
but you gat 100 percent adhesion. When you vacuum
bag the sheeting to the foam you can use less epoxy than
with the stack and weight method. I believe that
this is due to the vacuum pulling the glue out of the
grain and the amount of pressure applied from the
vacuum. It is important to obtain a vacuum pump
that you can regulate such as the one Aerospace
Composites sells. The vacuum can be no greater
than eight inches of mercury. If the vacuum
exceeds this amount it will crush the one pound per
cubic foot foam. Also of importance is not to core
the wing out until after the sheeting has been applied.
Since the wood is already bonded to the foam at this
point more foam can be removed from the wing. I
will cover a process in the future where almost all of
the foam is removed from the wing. When applying
the glue on the wood use a low viscosity epoxy such as
Hobby Poxy Smooth And Easy. Scrape the glue thin
enough so that the glue is only in the grain of the
wood. The surface of the wood should have a damp
look without being shiny. If using carbon veil
under the sheeting, thinner sheeting can be used.
Experiment with sample pieces to see how much epoxy it
will take to soak through the veil and bond to the foam.
I ran some experiments on this and had good luck with
just putting the epoxy on the wood and letting the glue
wick through the veil and bond to the foam under vacuum.
Pattern R/C wings were sheeted with the veil located
where the ailerons were cut out. This increased
the trailing edge rigidity and stiffened the ailerons.
Carbon Fiber tow could be placed under the sheeting to
act as a spar also. Other variations to this theme
are sheeting the leading edge of the wing back to the
high point and placing strip ribs in the foam and
removing the foam after completion. |
| Coring The Foam Wing
When using the vacuum bagging
technique coring will have to be done after the bagging
is complete. Other wise the core will crush. I
tried to bag a wing that was already cored under low
vacuum and you wouldn't believe how fast I removed the
quick connect fitting after watching the wing almost
collapse. This was only a test but one
didn't need to repeat. When coring a wing it is
necessary to make a separate set of templates. The
templates become too flimsy if they are designed to do
both cutting and coring operations. Here again I
found it beneficial to suspend the wing and let the wing
rotate around the hot wire. |
| Foam Cutting
Machines There are a few
machines that are commercially available and when the
instructions are followed produce excellent cores.
There is no one cutter that will do all of the different
variations of wings possible. There are the high
aspect sailplane wings that need different methods and
setups than a short low aspect ratio combat core.
High taper wings such as a jet airplane are inherently
hard to cut due to the tip melt-away when cutting.
The control line wing is probably one of the easiest
wing configurations to cut. I developed my own
cutter that cuts both sides of the wing at the same
time. It speeds up the process and if you are
careful when making the templates the wings are
accurate. The Feather Cut machine is a good cutter
that will cut only one side at a time. When using
this machine it is important to have a flat work surface
to lay the foam block on when cutting since a warped
work surface will transfer into the airfoil when |
| The Hybrid
Foam/Balsa/Carbon/Built-up Wing The
idea behind this wing is to vacuum bag the leading edge
sheeting over the pre-placed full span spar capped with
carbon and place ribs behind the leading edge sheeting.
The leading edge sheeting extends to the high point of
the wing. The ribs are of the I beam variety and are
placed into grooves cut into the foam and sanded flush
with the surface of the foam. The trailing edge is
then glued to the ribs and the trailing edge sheeting
and cap-strips are then added. After the LE
sheeting has been bagged down to the foam then the
leading edge is completely cored down to the wood.
The remaining foam left between the ribs is removed.
Basically the foam is used as a fixture to hold all of
the ribs and sheeting in place then removed. It is
a hard process to present without pictures so there will
be more pictures and info on this process in the future. |
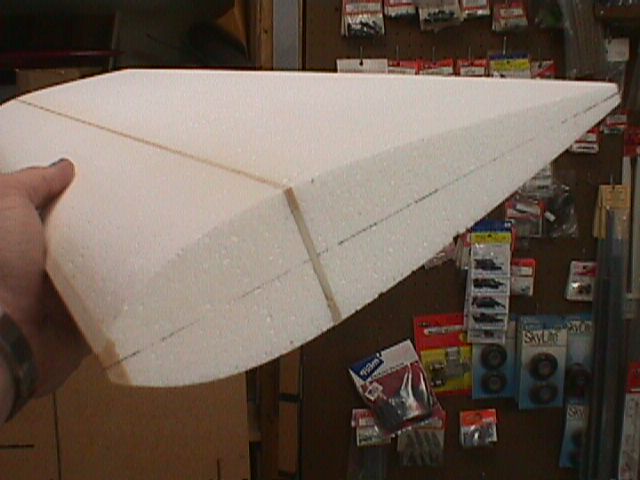
|  This
picture shows a wing with a spar installed ready for the
leading edge sheeting to be vacuum bagged down over the
leading edge to the spar. Balsa strip ribs will be
laid into grooves behind the sheeted leading edge.
Notice that the leading edge is already tack glued to
the foam. It is not necessary to glue the leading
edge completely to the foam since the foam will be
removed after the bagging process. The spar is a
built up balsa warren truss configuration. This
picture shows a wing with a spar installed ready for the
leading edge sheeting to be vacuum bagged down over the
leading edge to the spar. Balsa strip ribs will be
laid into grooves behind the sheeted leading edge.
Notice that the leading edge is already tack glued to
the foam. It is not necessary to glue the leading
edge completely to the foam since the foam will be
removed after the bagging process. The spar is a
built up balsa warren truss configuration. |
| Template Material
The best template material for
cutting foam is a product referred to as Formica.
It is used in counter top applications and can be
purchased in sheets at your local building supply store.
Another good source of this material is a kitchen
cabinet makers shop. They usually throw the scrap
away and will gladly give you their scraps. I try
to get the thicker material which seems to be flatter.
There is a thin variety but it seems to curl too easily.
Solid light colors seem to work the best since you will
be able to see the centerline on the material. The
type of cutter you are using will dictate the design of
the template. Templates that cut only one side of
a wing at a time will vary from one that is designed to
cut the top and bottom simultaneously . |
|  |


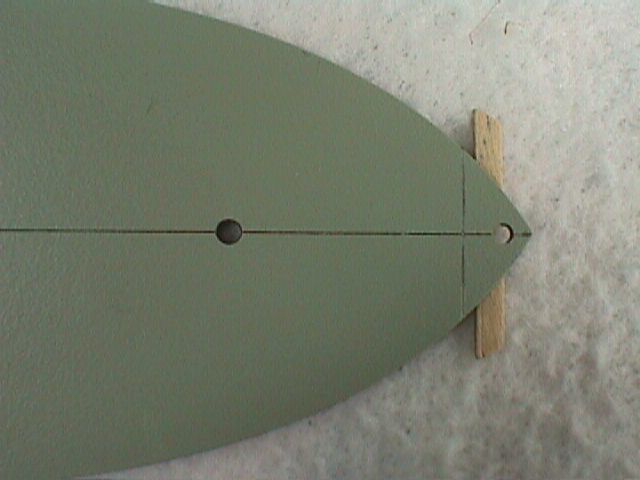

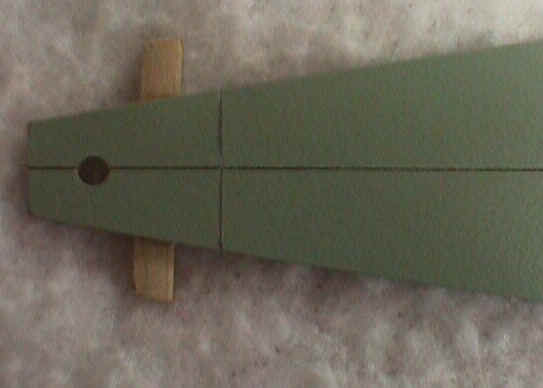
 The
simple adjustable height gauge that is used to scribe
center lines around the foam block.
The
simple adjustable height gauge that is used to scribe
center lines around the foam block.